3.1. Instant Restore
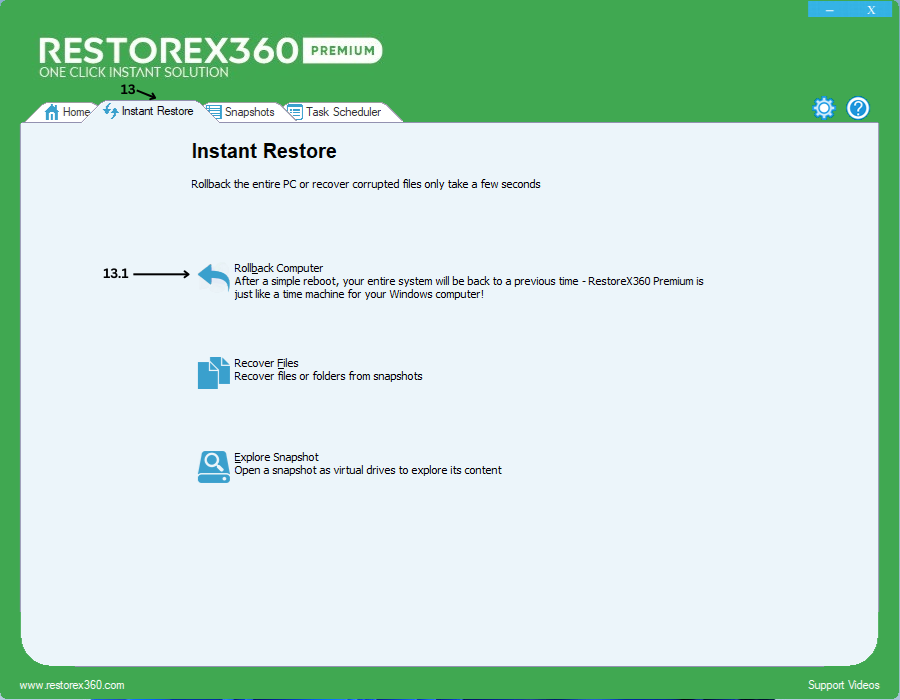
13.1 Rollback Computer
To roll back your computer using RestoreX360 Premium, follow these steps:
Click on "Rollback Computer"
Open the application and select the Rollback Computer option from the main menu.
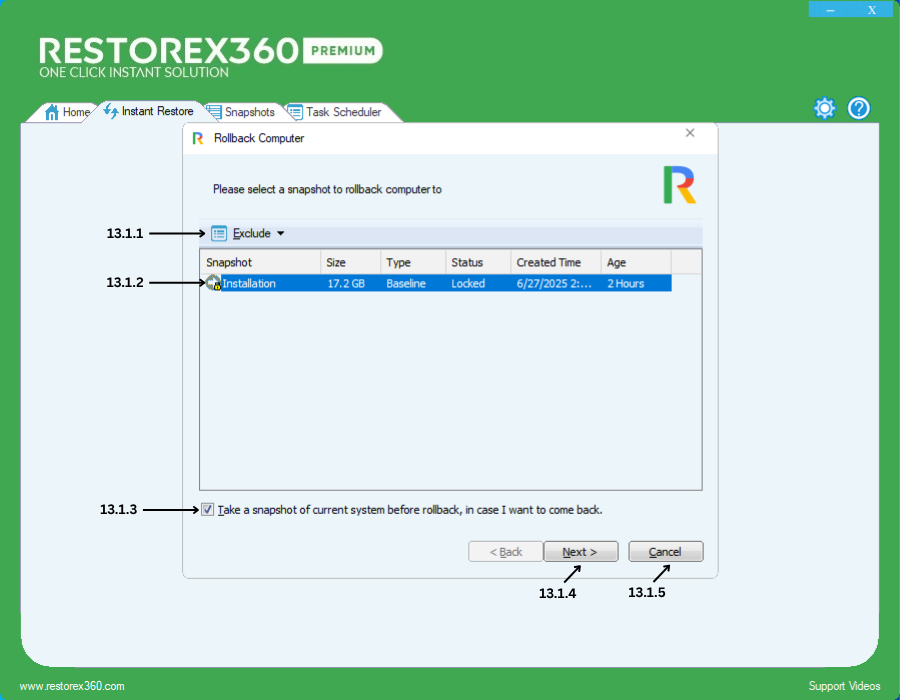
13.1.1. Select files or folders to be excluded from this rollback:
-
You can choose specific files or folders that should not be restored during the rollback process.
-
We recommend excluding only data files (e.g., documents, images, videos, etc.).
-
Avoid excluding system or program files, as doing so may result in system instability or data corruption after the rollback is complete.13.1.2. Select a Snapshot
-
Choose the snapshot you want to revert your system to. Each snapshot includes a date and time stamp, helping you identify the desired restore point.
Snapshot Details
a. Snapshot Name: Displays the name of the selected snapshot.
b. Size: Shows the size of the snapshot created by RestoreX360.
c. Type: Indicates the snapshot type, such as Baseline, User, or Automatic.
d. Status: Shows whether the snapshot is Locked or Unlocked.
e. Created Time: Displays the exact date and time the snapshot was created.
f. Age: Shows how much time has passed since the snapshot was created.
13.1.3. The sentence "Take a snapshot of the current system before rollback, in case I want to come back" means:
Create a backup of the current system state before starting the rollback process, so you can restore it later if needed.
You're saving the current condition of your system — like taking a photo — so if anything goes wrong during the rollback, you can return to this saved state safely.
Please Note: It is recommended to take a snapshot of the current system before performing a rollback. This allows you to restore the system to its present state if needed.
13.1.4. Click "Next"
-
Confirm your selected snapshot and proceed to the next step.
13.1.5. Cancel: Closes the current window without saving any changes.
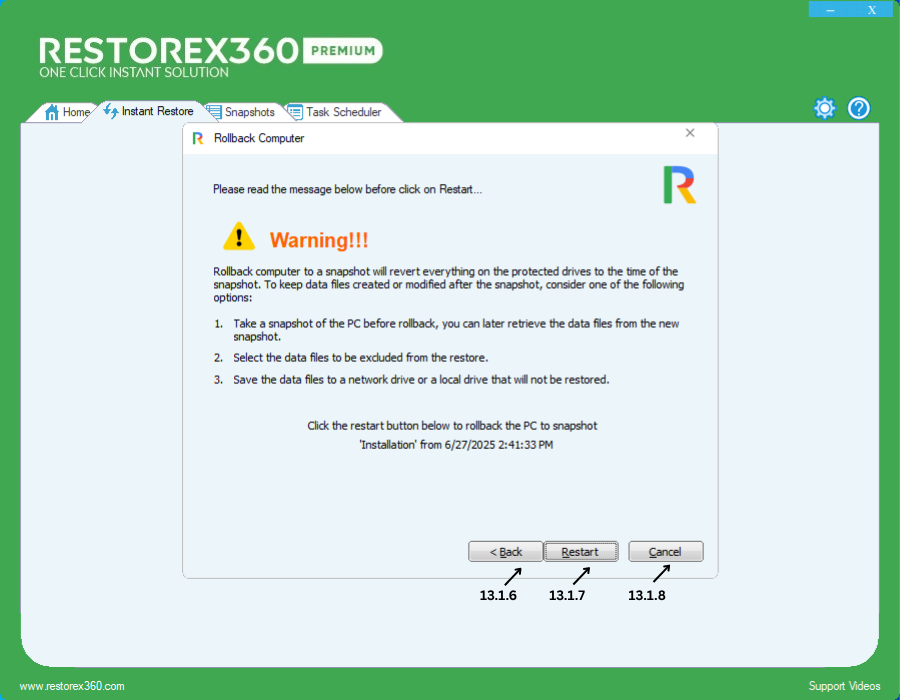
13.1.6 Back: Click to return to the previous step if you wish to review or modify any settings.
13.1.7 Click "Restart"
The system will reboot and begin the rollback process. Your PC will be restored to the exact state it was in at the time of the selected snapshot.
Please Note: Automatic Startup
After a short wait, your PC will start automatically with the system image and settings from the selected snapshot.
Important Note:
Before performing a rollback, ensure you back up any important data (such as files from Desktop, Documents, or Downloads) to a non-protected drive. Rolling back will remove all data and changes made after the selected snapshot was taken.
13.1.8. Cancel: Closes the current window without saving any changes.
13.2 Recover Files
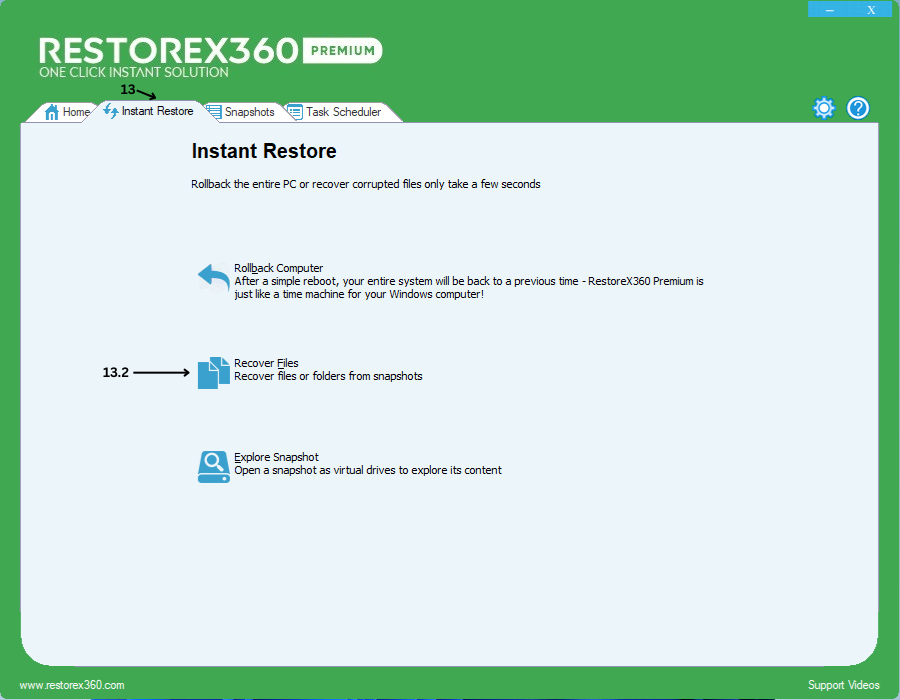
Recovering Files: .readme.doc, *.doc, and My Documents
With RestoreX360 Premium, recovering important files like .readme.doc, Word documents (*.doc), and files stored in My Documents is fast, secure, and efficient. Whether the files were accidentally deleted, overwritten, or lost due to a system crash, RestoreX360 lets you bring them back in just a few clicks.
13.2 Steps to Recover Your Files
Follow the steps below to recover your lost or deleted files using RestoreX360 Premium:
Select the Recovery Option
Choose the appropriate recovery method based on the information you have about the file or folder.
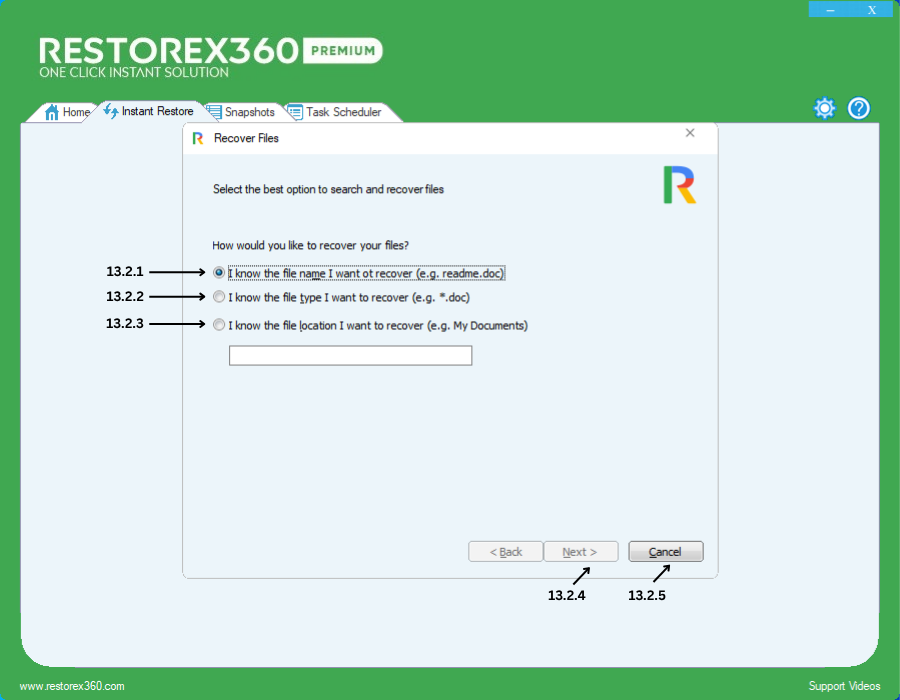
13.2.1 Recover a Specific File by Full Name
-
You can recover a file if you know its exact name along with the file extension.Example: restorex360.doc
13.2.2 Recover Multiple Files by File Type
-
You can recover multiple files of the same type if you know the file extension.Example: *.doc (recovers all Word documents)
13.2.3 Recover a Folder by Folder Name
-
You can recover an entire folder if you know its exact name.Example: My Documents13.2.4 Next: After selecting the option and entering the extension, click Next to proceed to snapshot selection.
13.2.5. Cancel: Closes the current window without saving any changes.
Recover Files
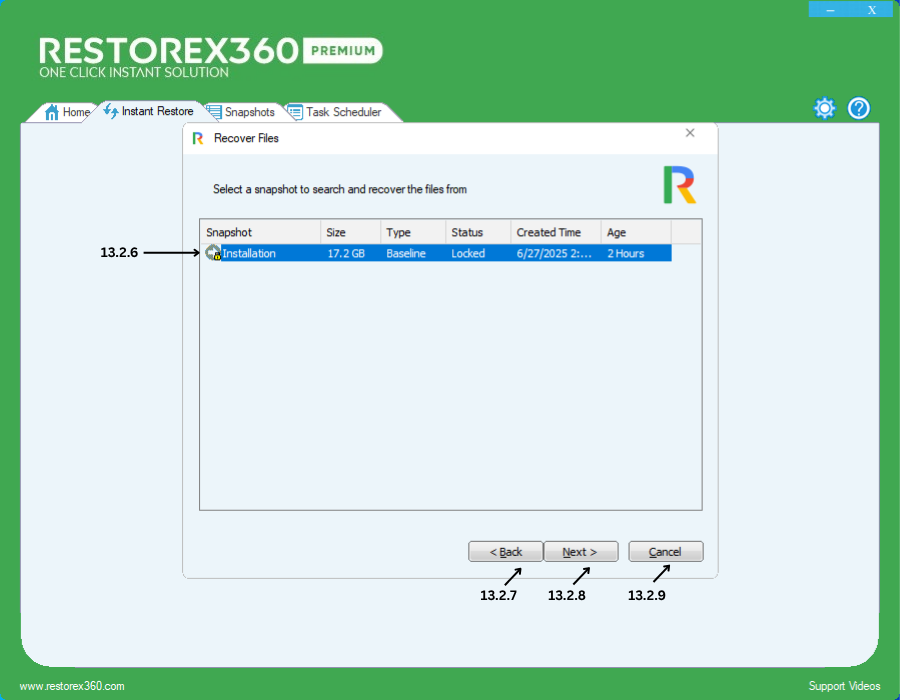
13.2.6 - Select a snapshot in which you remember the specific file or folder was available. Use the date and time to help identify the correct snapshot.
Snapshot Details
a. Snapshot Name: Displays the name of the selected snapshot.
b. Size: Shows the size of the snapshot created by RestoreX360.
c. Type: Indicates the snapshot type, such as Baseline, User, or Automatic.
d. Status: Shows whether the snapshot is Locked or Unlocked.
e. Created Time: Displays the exact date and time the snapshot was created.
f. Age: Shows how much time has passed since the snapshot was created.
13.2.7 - If you wish to return to the previous menu and choose a different recovery option, click Back.
13.2.8 - If you're ready to search for your data within the selected snapshot, click Next. The system will begin scanning that snapshot for your specified file (s) or folder (s).
13.2.9 - To cancel the recovery operation and exit the process, click Cancel.
Search Process and Cancel Option
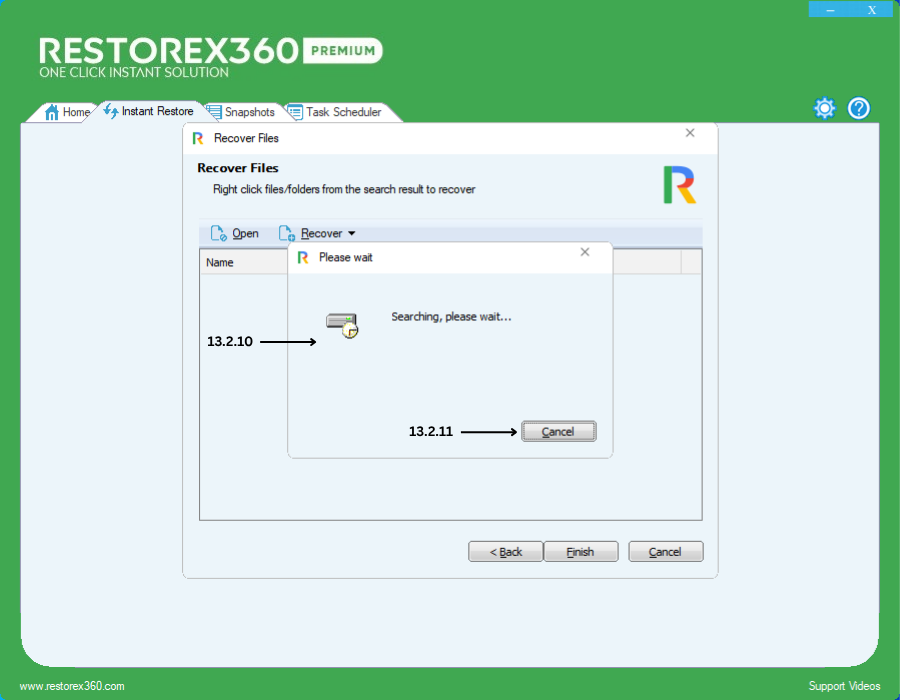
13.2.10 - Searching – Please Wait:
Once you enter the file or folder name and click Next, the system will begin searching the selected snapshot. This process may take a few minutes, depending on the size and number of files in the snapshot. Please be patient during this time.
13.2.11 - If you wish to cancel the search process at any point, simply click on the Cancel button.

Recovery Files
13.2.12 - Select the file you wish to recover from the search results.
Files Details
a. Name: Displays the name of the selected file.
b. Folder: Shows the location (path) of the file.
c. Size: Indicates the size of the file.
d. Type: Displays the file type or extension.
e. Modified: Shows the date and time when the file was last modified.
13.2.13 - If you decide not to recover any file, click Back to return to the previous step.
13.2.14 - If you are ready to recover the selected file(s), click Finish to complete the recovery process.
13.2.15 - If you want to cancel the recovery process, click on Cancel.

13.2.16 Open
To preview a file, select the desired file and click on the Open option. This will allow you to view the contents of the selected file.
13.2.17 Recover
When you click on Recover, two options will appear: Save As and Overwrite. Detailed explanations of both are provided below.
13.2.18 Save As
Clicking on Save As will open a mini popup window. In this window, you can:
-
Choose the location where you want to save the file.
-
Create a new folder if needed.
-
Click OK to complete the saving process.
13.2.19 Overwrite
Clicking on Overwrite will automatically save the file to its default location, replacing the existing file if one exists.
Important: If you do not have permission to overwrite data in the C: Drive, an "Access Denied" message will appear. In this case, use the Save As option to save the file to another location. Once saved, you can manually move or overwrite the file in the original location with proper permissions.
13.2.20 - If you decide not to go back, click Back to return to the previous step.
13.2.21- If you are ready to recover the selected file(s), click Finish to complete the process.
13.2.22- If you want to cancel the process, click on Cancel.
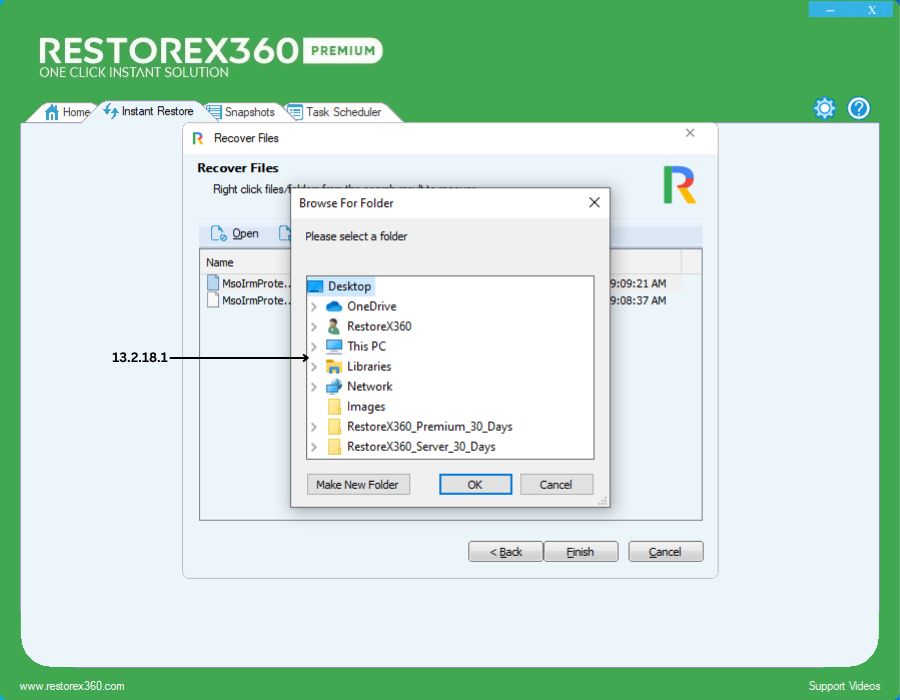
13.12.18.1 Browse For Folder
Use this option to select a drive or desktop location where you want to save your data. You can also create a new folder within the selected drive to organize your files. Once done, click on OK to confirm and proceed.
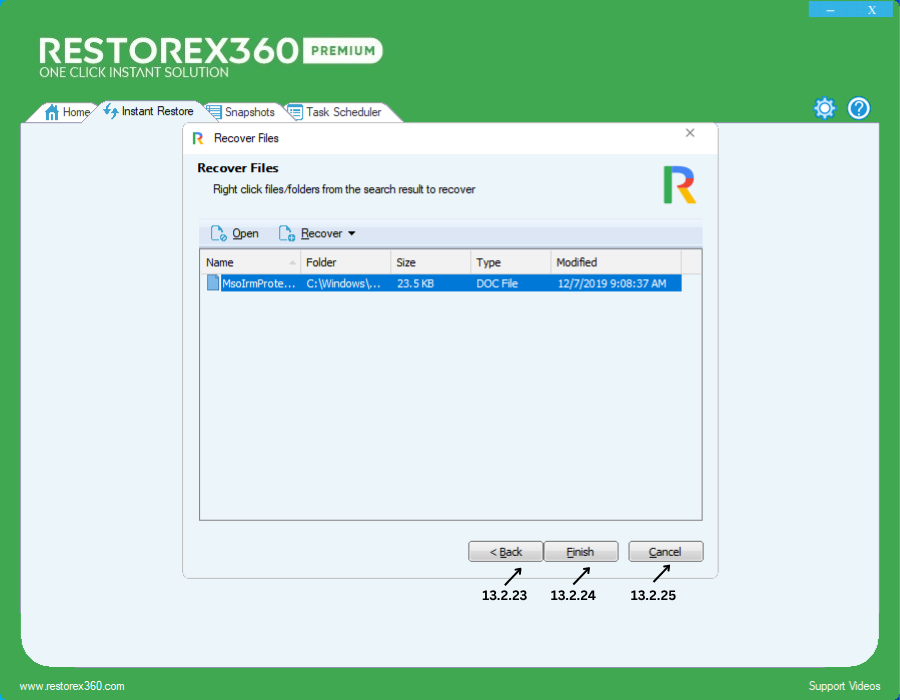
13.2.23 - If you decide not to go back, click Back to return to the previous step.
13.2.24- If you are ready to recover the selected file (s), click Finish to complete the process.
13.2.25- If you want to cancel the process, click on Cancel.